
Alrighty then. I thought I'd fool PICASA by using Flickr to upload these photos and audibly sighed with relief when Flickr uploaded them reliably. Good 'Ol Flickr.
And then Flickr gave me a nice little notey note saying that my photo limit is almost reached with THEM TOO. BUT (good news!) I can UPGRADE with them! (tongue in cheek, in case you didn't know)
So, I guess the bandaid I was trying to cover up the gaping wound with wasn't waterproof when I went diving into the deep end. or something like that. Oh well. Can't outsmart them all.
While I sort this thing out, I can still post photos via Flickr but I'd better figure it out quick because I've already been told I don't have much time....
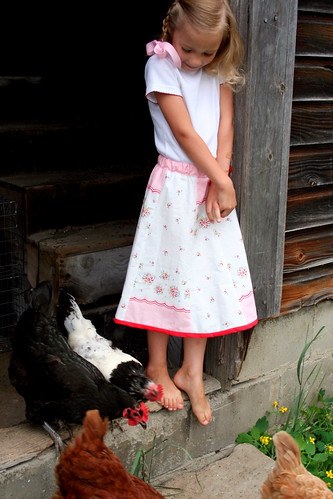
Onward PILLOWCASE TUTORIAL.
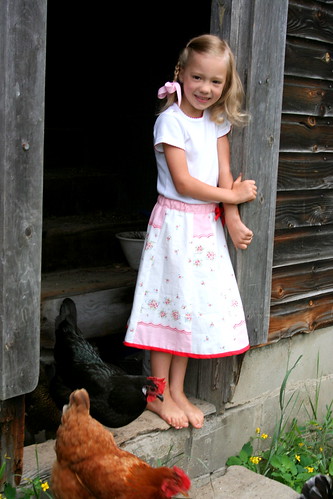
A funny thing happened when I was trying to recreate this pillowcase skirt for a tutorial.
It didn't work.
Maybe that is because it was two weeks between the times I sat down to sew. Maybe it was because I was fudging it all the first time through. Who knows.
I now have two skirts SIMILAR but not the same as the first and a tutorial that will have lots of options. Bear with me please.
The difference between the first skirt and these skirts is the flounce/twirly factor. I FINALLY realized, after trying twice to recreate the pillowcase skirt exactly (without success) that the problem was I was not cutting enough "wedge pieces".
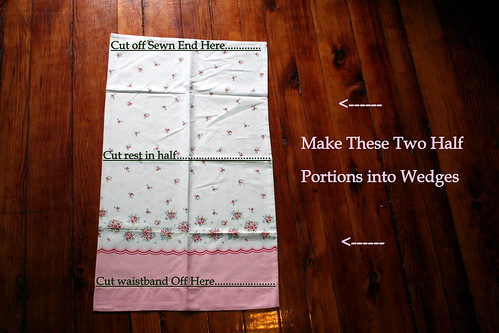
One pillowcase can be made into a twirly girl skirt for a YOUNG girl (or SKINNY girl) by cutting off the top of the enclosed portion of the pillowcase and the waistband (if you choose) and THEN cutting the rest of it in half. THEN cutting your "wedge" pieces out of the two halves. That will give you 6-8 pieces of skirting to work with and a shorter lengthed skirt. THAT is what I did with the first skirt. Like this:
This skirt and another I was playing with were made using all (or almost) the entire length of the pillowcase and thus, I didn't have enough "wedge" pieces to make the flounce...well, er, flouncy. This looks more like a glorified A-line skirt. And because I didn't have twice as many pieces for the skirt--the waistline was actually a bit too thin so I ended up using the extra cut off piece at the top for one more wedge to add some width.
I would say--stick to making these with a skinny girl or a young girl to ensure the waist will fit nicely.
Upon pondering it, though, an adult (or bigger girl) version could be made using two pillowcases with "wedges" alternated. If ever I come across two nicely complimentary (or matching) pillowcases, I think I'll try a big version too.
So---I'm doing swell, posting a tutorial that already needs mistake clarification. That's SO like me.
~~~~~~~~~~~~~~~~
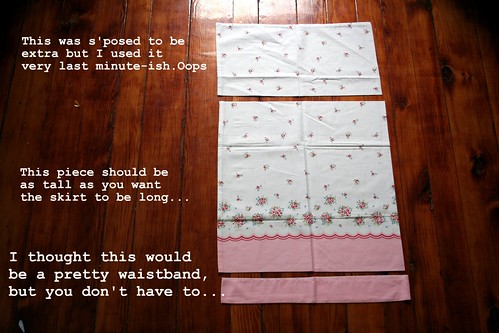
1. First things first~ you cut your pillowase. The length you cut will be determined by how long you would like the skirt to be. If you will use bias on the bottom and an added waistband, you need only to add 1/4inch seam allowances. If you plan to hem the bottom yourself, add 3/4 of an inch to your desired length. You can cut a waistband out of the pillowcase or use an extra bit of coordinated fabric. I chose to use the pink bottom portion for the waistband and cut JUST above the stitching. The perk from using the end piece is that the edge is already hemmed for you.
 2. Next, you cut the rest of the pillowcase into wedges. If you are a perfectionist, measure them equally. If you don't care, don't. It isn't noticeable if they don't match, especially if you are making the FLOUNCY version with eight pieces.
Keep in mind though~the wider the bottom the flouncier it will be, but the smaller the waist will be.
If I had this to do over again, I would have taken more care to make the wedges equal but I thought this skirt was going to be another trial run flop, so I didn't take my time. Even still, you don't really notice.
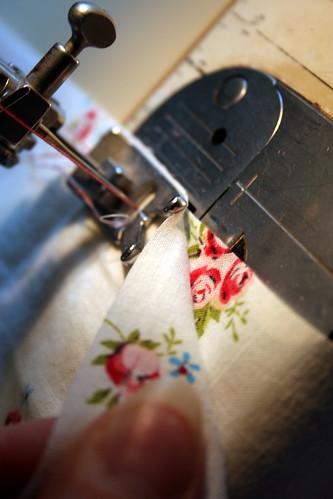 3. Once you have your "wedges" cut, you stitch them together being sure to stitch RIGHT SIDES together. Once all individual wedges are stitched together, stitch the first and last wedge together forming the skirt loop.
As you can see below, I added the "excess" fabric from the pillowcase as another "wedge to make the waist big enough. I ended up putting the excess in back but upon completion realized it would actually have been super cute as the front panel too. I love it when you can't screw projects up.
 If I have deterred you from my haphazard "wedge" cutting, may I redeem myself with the care taken in my inner seams. There was a time not so long ago where I would not have taken the time to worry about them and then become frustrated when they got all straggly in the wash and I would curse the look of handmade clothes. Silly me. I learned from the master though, and have learned the errors of my ways. A little bit of extra care really makes all the difference in the world, so I am learning.
(Except when cutting wedges. hehehe)
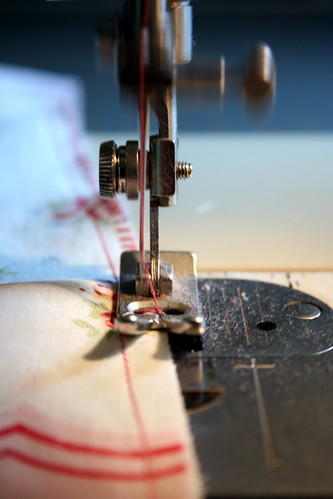
So step 4. is naturally, to finish inside seams. If you don't have a serger, take heart. Neither do I. A zigzag stitch being made slightly over the end of the fabric will do a nice job. Plus, (shhhh!) they are kinda fun to zoom right along...
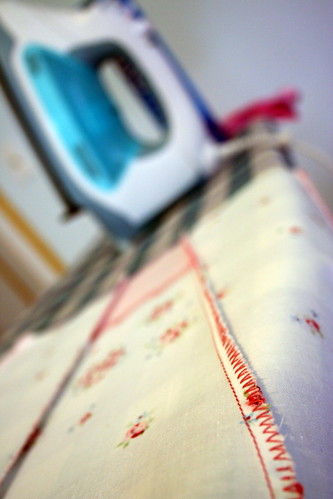
5. Another oft overlooked step is ironing but that too is important, takes but a moment, and the added care makes a tremendous difference in the overall project. (Thanks Nancy. I love you.)
6. Your skirt body is almost done and can now be set aside for a bit. Go ahead and grab that waistband fabric. It couldn't escape us forever, I'm afraid.
Determine your child's waist measurements and cut out the waistband that measurement plus about 3 inches. In the skirt I was working with (a more A-line version) I cut the waistband to fit the skirt body plus seam allowance.

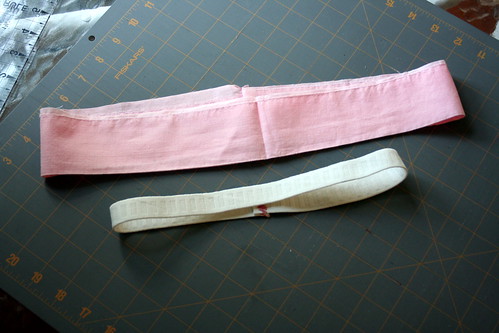
Step 7. Cut your elastic the waist measurement plus about 1/2 inch. Then, stitch BOTH the waistband and ELASTIC into loops taking care not to twist them in the process. I sew the elastic a few times back and forth to be sure it just AIN'T GONNA COME UNDONE.
 Step 8 isn't photographed because I didn't do it. The waist of my skirt body was too small to gather (Hence the A-line look) but if yours is flouncy it will need gathering. Stitch a long gathering stitch across the top and another 1/4 inch below that line and gather by gently pulling the top thread at either end. You will gather the skirt to equal the waistband.
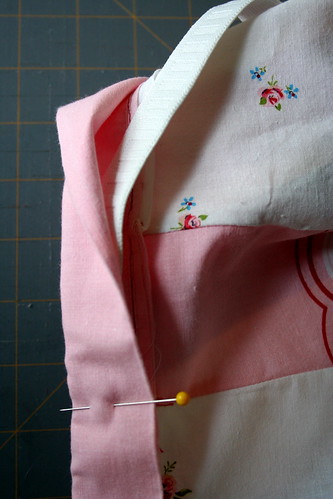
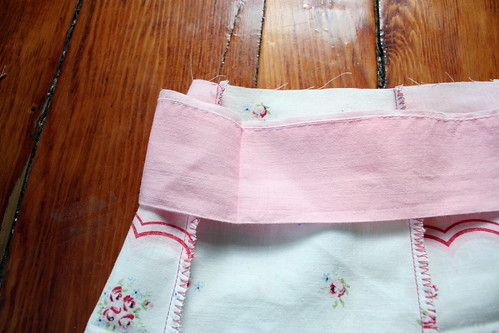 Step 9. Wow this tutorial is taking a long time. Now is the time I assure you the actual sewing doesn't take this long! :-) Again, bear with me. Next step is to first iron fold the waistband so you know where the center is and then pin the waistband into place. Pin it RIGHT SIDE of waistband to WRONGSIDE of skirt. This sounds weird because it is, but trust me. Notice also, I put the waistband seam in the BACK panel of the skirt. No use having it on the front, right? GO ahead and stitch it to the skirt.
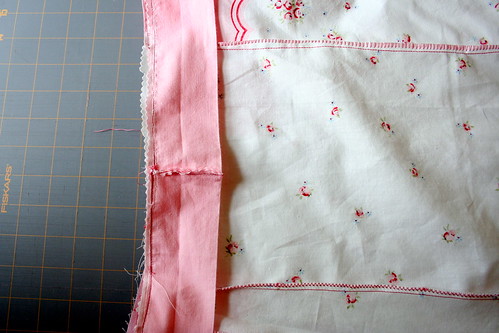
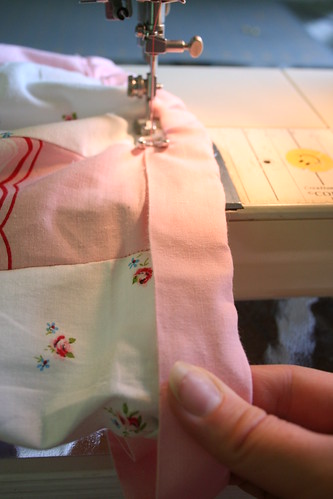
Step 10. Turn the skirt right side out. If all goes well the "wrong" side of the band is facing you when the skirt is right side out. Follow the iron line and fold the waistband over the right side of the fabric. Because you used the bottom of the pillowcase, you don't need to hem this as the seam is already hidden! And because you stitched the very backword sounding way you did, you will not have an extra line of stitching in view. Yay!
Insert the elastic loop and as you go, pin it as best you can.
When you stitch the band down, eventually you will have to stretch the elastic to accomodate the bandwidth. Hold on behind the needle and in front of the needle so that the elastic pulling doesn't break or bend your needle. Bcause that would really stink. (I'm not doing that, obviously, because one hand is snapping the picture. Duh.)
 Phew! By now, it is looking like a nice skirt, eh?!? All except the undone hem at the bottom. But that is the last step! Hallelujah! Instead of a hem, I thought a splash of color would add something to this skirt, so I found some bright red bias tape and sewed that on along the bottom edge. I sewed from back to front.
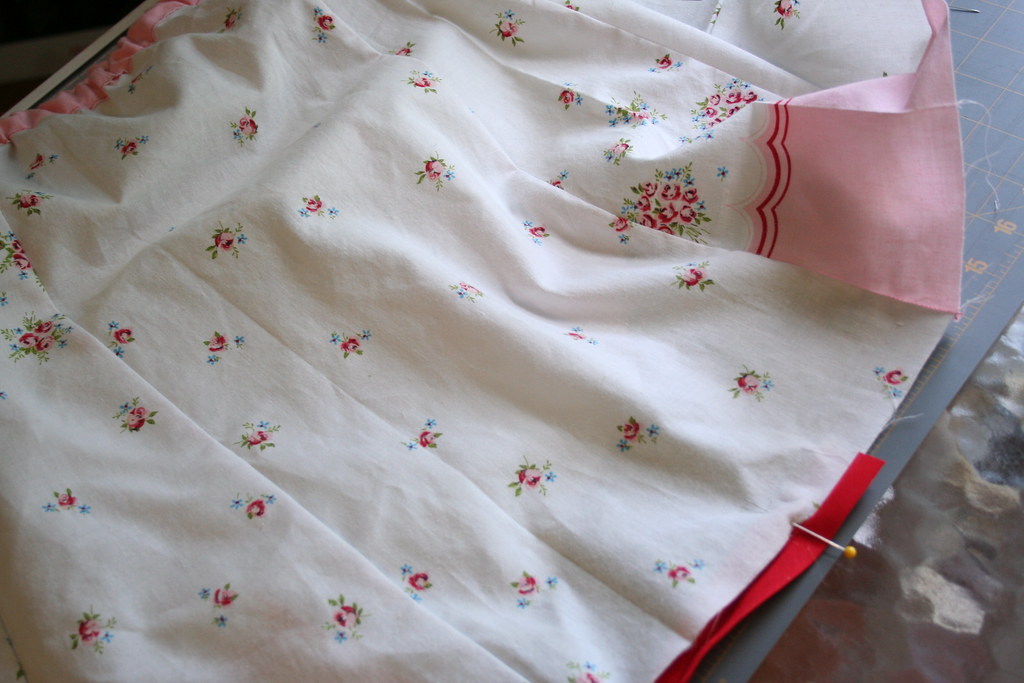
And then, for kicks, I added a bow on the side too. I just thought that bit of red was gorgeous and made the red accents in the fabric POP out. Love it. Even if it is a bit Valentine-y.

There you have it. Clear as mud, right?!?
If anyone actually USES this tutorial~let me know and share a picture with me, KAY? It will make the last three hours of blogging this ONE post worth it. ;-)
16 comments:
LOVE IT!!!!!!! THe way you switched the pieces up and down, the bias hem line. I need to re-read the instructions again, but I think I get it. How come you find all the good pillow cases? All the ones I ever find are ragbag quality.
I was being lazy the other day and found your skirts you made for sewing seeds- I'll being following the link you posted and making some for my babes. Great way to use up odds and ends!
Thank you Nancy, for teaching our dear friend the importance of ironing as you go, when sewing.
Being a mostly self taught seamstress, I learned that the hard way.
I've used photobucket.com to upload pictures. Another idea would be to create a second Flickr account. Could webshots.com work for you?
This looks like fun to make :) When I find a good pillowcase then I will attempt it. Thanks for all the effort you put into your tutorials.
Jennifer
Well, I could not wait until I found a pillow case and I had the perfect fabric remnant so I made it this afternoon. It turned out great. Thanks so much!!!
I did post a picture of my daughter wearing it on my blog.
I am like a total novice seamstress but this looks great! I'm feeling in a very 'crafty' mood lately, so this is on my list! How old is your dd again & what size? I trying to gauge this for my dd! Thank you for posting this!
Blessings!
Corynn is 5 and very skinny in the waist. The ideal age would be 2-4 yrs old because then you could cut it in half for more panels. Please show me if/when you try! I'd love to see it!
Awesome tutorial, Rebecca! If I weren't so terrified of my sewing machine, I would have to try it. I am still working on sewing really basic things...like a straight line. :) lol I haven't heard from you in so long! ;)
Rebecca - My first time on your blog, and what a surprise to find such a creative tutorial. Great use of a pillowcase. The reason I came is because over on my blog back in May I offered a giveaway. Guess who won???? Unfortunately, it would appear that you lost your way back. I didn't see an e-mail for you on your profile, so thought I would try this venue. Please come back and pick up your prize.
Ok, thanks, Rebecca! I will keep that in mind!!! :)
Rebecca,
Wow, this is wonderful! In fact, I can see Orangeblossom loving this little skirt. I'm going to have to give this one a try!!
Two years ago, did you ever think you would be writing sewing tutorials? You've come a long way, baby. Great job!!!
Thank you so much for this tutorial!!! I can't wait to try it!! My girlies will LOVE it!
Andie
Thank you Rebecca! If I can find some pretty pillowcases I'll give it a try!
Rebecca....I love your blog, and this tutorial! I linked to you from my blog at www.creative-christmas.blogspot.com
I cannot wait to make one of these! Check out our pillowcase backpack we did earlier this week!
I love it! I linked at somedaycrafts.blogspot.com
this is so cute! I hope to make one of these for my little girl...she loves skirts!
Anne
Never mind. I found the tutorial! :D LOL!! I pinned it! :D
Post a Comment